Wednesday, March 20, 2013

Cherry Cupcakes

I think I'll bake some cupcakes today, more for the purpose of using up some cake mix in the pantry than for any other reason.  My waistline certainly doesn't need it!  Of course, it also gives me something to post about.  Except that I don't think these will be anything fantastic, just your basic, slightly-doctored-up cake mix with frosting.  I'm even going to use one of those little packets of frosting flavors in my home made buttercream.

However, if I'm to be completely honest with myself, I think I'm procrastinating finishing the purse pattern I told you all about a few weeks ago.  In defense of myself, I did take photos of the green bag I posted pictures of in order to add them into the pattern, but many of them turned out so blurry I need to make it again just to take the pictures!  And, oh, I can come up with many reasons to put that task off-I don't have the yarn I want to use (bought it weeks ago now), my husband isn't available to help me take the new pictures (which was the problem before, and I tried to take them on my own), my nail polish is chipped (that one seems to be a constant problem)-as you can tell, I'm pretty good with the excuses!

So, on to the cupcakes.  I mentioned that I want to use a frosting flavor--Duncan Hines has put out these little packets of fun flavors to use with their canned frosting.  Well, I have to admit--I hate canned frosting!  I know of very few people who actually prefer the taste of canned over home made frosting-if you're one of them, ignore this part!  Feel free to use the canned stuff!


If you're more like me, though, then proceed.  :-)  You can use the flavor packets with your own home made frosting with great success.  Today I'm going to use the cherry vanilla flavoring.  I've never tried it before, but I think it's a great choice for the first day of spring!

In my experience with the Duncan Hines frosting flavors, they are quite sweet.  Definitely for the kid in us!  I'm going to try and down play that a bit in the cupcake.  I'm using Betty Crocker yellow cake mix, and I'm going to change it up a bit like I usually do when using cake mixes.  Simply replace the water with an equal amount of whole milk (if all you have is low-fat, that's okay too!) and replace the oil with melted butter.  Please do use real butter!  In addition, I'm going to add in some chopped maraschino cherries and pure almond flavoring.

I debated a bit with myself on the cherries--maraschino cherries are hardly "real" cherry flavor!  I have some home made cherry jam that I might have added--but then, I thought it might also add extra sweetness, and I don't want that.  After tasting a bit of the batter, I think I made the right choice.  It reminded me of the cherries in Ben and Jerry's Cherry Garcia ice cream!  MMM!  I wish I had some dark chocolate chunks--must remember that for the next time!


Anyway, I added about a teaspoon of the almond flavoring.  Almonds and cherries really go good together, a very classic combination.


By the way, did you notice my nice orange-ish batter?  That's because I thought I'd try adding a little of the cherry juice to color it a bit, and the red combined with the nice dark yolks from my hen's eggs and made that lovely orange.  Oh well, no biggie.  I might have avoided that if I wanted to substitute 2 egg whites for each egg.

All ready to go into the oven!


Now for the frosting.  I do make a pretty traditional American butter cream, although sometimes I'll play around with the ratios of ingredients.  Today I'm only going to use 1/2 cup of butter instead of a whole cup ;-)


 Cream it, then add the powdered sugar, about 3-4 cups.  I use a Kitchen-Aid stand mixer, which is pretty heavy duty, but if you are using something with less power, you might want to add a tablespoon of milk to make it a little easier on yourself.

Then add in the frosting flavor:


And add in milk to achieve the right consistency.  How much is that, you may ask?  Depends on how you want to frost--just a little milk (try a teaspoon at a time) if you want to make those nice swirls with a pastry bag and decorative tip.  Add more milk if you want to spread it smooth with a metal spatula or knife.  You can even make it thin enough to dip the tops of the cupcakes into the frosting and cover them that way--the choice is yours!  If you go too far with the milk, simply add more powdered sugar, one tablespoon at a time, to get it back to where you want it.

Truth-telling time:  I found out I didn't have as much powdered sugar as I thought AFTER I started this recipe, so I simply used up all I had, and then thinned out the frosting so that I could stretch it as far as I could!

Frosting--yum!


Definitely needs a cherry on top!


Time to taste--drum roll, please!

Oh my, this is good!

I think I stumbled onto something here--the almond flavoring in the cake is soooo good, it brings up the cake mix several notches in my book!  I bought this through one of the best online baking sites: King Arthur Flour. They have excellent ingredients, even if the shipping is expensive if you live on the West coast like me!  They do have free shipping offers from time to time, however; be on the lookout!


I only added about 1/3 cup of chopped cherries, and they are very yummy in this cake, and I could see adding about twice that amount.


But, even as they are, they are delicious!

The frosting is pretty good, too.  I think I'd play around with using the maraschino cherry juice to flavor my buttercream the next time, and save myself the trouble of an extra ingredient.  But then, that flavoring packet isn't too bad--I'll have to try it without and see which is better.

Next time, I'll have on hand some dark chocolate chunks to throw in--oh, my, wouldn't that be good!

That's it for today...I think I'll have another cupcake!

Vanessa


Thursday, March 14, 2013

Red Beet Eggs

I can't believe that, given I grew up in PA Dutch country, I've never made red beet eggs at home.

They are so good!

And, as I found out this week, so darned EASY to make!

Now, add that to the fact that for the past, oh, six years or so of country living, my family has often had to deal with an overabundance of eggs from our hens, to to the tune of sometimes having as many as fourteen dozen eggs in our fridge at any given time.

That's fourteen dozen.  One-four.  That's 168 eggs in my family's refrigerator.

We like eggs, but most of the time we have a hard time with eating this many, and I think I've noticed friends go running the other direction when they see us coming, egg carton in hand.  We've even been known to not let complete strangers leave our property without taking home at least a couple of dozen!  So, you'd think I'd have figured out long ago what to do with all those eggs aside from letting my boys see how far they can throw them into the field across the fence.

In comes the idea for making red beet eggs.


Without fail, my California friends are like, "red beet what?" when I tell them about these pickled delicacies. A few folks really don't like beets, either, to which I have no response.  I do love the earthy goodness of beets, fresh boiled, roasted, or pickled.  Not everyone has the same opinion.  

But, if you do like beets, you'll probably love red beet eggs.  And with Easter just around the corner, they'll make a pretty addition to your Easter dinner table!


These are super simple to make, and take only as long as it takes to hard boil some eggs.  Oh, and I found out a cool trick for that, too!

Since we've had fresh eggs, I've found it super hard to peel them without losing half of the whites.  Now, I know that the fresher the egg, the harder it is to peel.  But even with eggs that have been in my fridge for a couple of weeks it seems I can't peel them to save my life!

Pinterest to the rescue. (don't you just love that website?!)  About a teaspoon or so of baking soda added to the water while boiling these beauties let the peel practically slide right off!  Now I don't have to buy a dozen eggs at the store when I want to make deviled eggs (or red beet eggs!)

Okay, enough talking.  Want to try these?  Here's the recipe:

Red Beet Eggs

for one quart jar:

1 14-oz can of sliced beets (not the ones already pickled)
1/2 cup white vinegar
1/2 cup sugar, or more or less to taste
6 eggs, hard boiled and peeled

Drain the juice from the can of beets into a saucepan and add the vinegar and sugar.  Bring to a boil, then cover the pan and simmer for about 15 minutes.

Meanwhile, add the still warm, peeled eggs to the quart jar, and cover with the drained, sliced beets.

Pour the hot vinegar mixture over the eggs and beets in the jar, adding a little water if needed to fill the jar to within 1/2 inch of the top.  Screw on the lid, place in the refrigerator, and you're done!

Wait at least three days to eat.  Red beet eggs will last 3-4 months in the fridge, according to the National Center for Home Food Preservation. I think once you've tried them, they won't last that long though ;-)

Vanessa


Tuesday, March 12, 2013

Lemon Cupcakes with Raspberry Curd Filling

Until I can find the time to sort out various pages of my blog, I will post my kitchen exploits here as well!

It was girl's night out again, and I was bringing dessert.
I love to tempt folks with recipes that they may not otherwise find at the typical grocery store....chocolate cupcakes with chocolate buttercream frosting may be good, but one can find those anywhere.

I thought of what I had in the kitchen...hmm, lemons are good....lemon cupcakes, even better.  I have made lemon meringue cupcakes that are delicious, but I wanted to try something new.

What tastes great with lemon?  Raspberries!  I Googled "lemon raspberry cupcakes" and came up with a few recipes.  The one I liked most had lemon cake, lemon butter cream frosting, and raspberry curd.

Raspberry curd?  I'd never heard of that! Lemon curd is recognizable here in the States as that yummy filling of lemon meringue pie, but I'd never thought of using berries of any sort to make the same kind of filling.  I could see by the recipe that it wasn't difficult to make, and didn't require any odd ingredients.  Perfect!

I decided to follow some of my own recipes, and use the curd recipe I'd found online. ( I tried for the life of me to create a link to the website for you, but I cannot get it to load!  The website is this: www.smells-like-home.com, and you'll find the recipe under May 2012.  My apologies to that blog's creator!)

 This is my finished product::


 Now I'll tell you how I made them!  Follow along with the pictures, and I'll post the full recipes at the end.

First, you'll make the curd because that needs to be completely cool.  You can even make it a couple of days ahead if you like.  My apologies for not taking multiple photos of the process, but below you can see the end result of pressing the cooked curd through a sieve to get rid of the seeds:


And this is the cooked, deseeded curd, a mixture of butter, egg yolks, sugar, lemon juice and raspberries:


You'll want to cover this and put it in the fridge to cool completely.  It will thicken up a bit more when it's cool.
As this was the first time I'd made raspberry curd, I wasn't exactly sure when to tell it was ready to take off the burner.  I do wish I'd cooked it a little longer to see if it would thicken some more, or maybe add a bit of cornstarch (like I do for lemon meringue filling).  Still, it worked out okay!

For those of you able to locate the original recipe, you'll notice that I made a different cake and frosting recipe.  I have my own for vanilla cupcakes that I've adapted from the Sprinkles strawberry cupcake recipe (and that recipe is delicious as it is, but I omit the strawberries and use less sugar!) 


You'll need lemon zest.  This is the yellow part only of the rind, and a lemon zester really helps with that:


Mix the flour, baking powder, salt, and lemon zest together:


Cream the butter and sugar:


Add the egg yolks and egg whites:


Add the vanilla to the milk, then add the flour and milk to the creamed butter and sugar mixture, a little at a time:


As you can see, the final batter is quite thick!  Yum!

Scoop the batter into cupcake tins; ice cream scoops are great for this task!


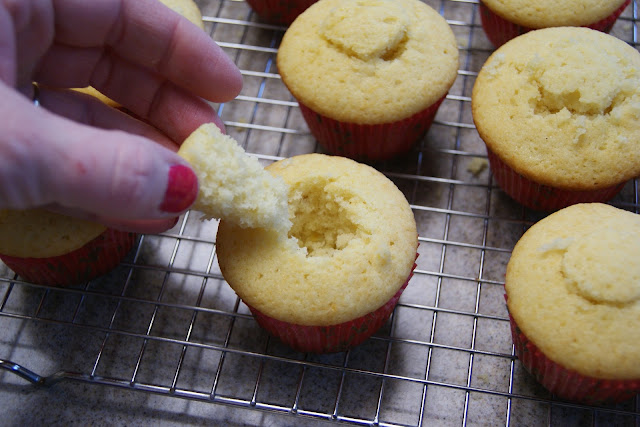
Use a paring knife or vegetable peeler (the pointy end!) to cut little holes from the tops of the cupcakes.  You can take of a little of the cake off the bottom of those cones if you want:


Fill those holes with the cooled raspberry curd:


and put the tops back on!


Now make the frosting.  I didn't take any pictures of that process, sorry!  I did, however, take this nice shot to tease you all with:


I didn't have any raspberries left over, or I would have decorated the tops of these yummy treats with a fresh raspberry.  They'll just have to do as they are! 

Enjoy!


Before I give you the recipe, let me discuss a little about the ingredients.  I use real, whole food products whenever I can, because I believe that if we are incorporating these yummy treats into our diet in small amounts, we should be enjoying the foods as God intended them to come to us!  No cow ever produced non-fat milk, and margarine is two steps away from plastic!  Yuck!

Plus, whole milk, real butter, etc., affects the final product, called "mouth-feel" in the case of cake.  You'll have better tasting food, and the cake will be more tender than if you used non-fat or even low-fat dairy products.  Yes, you can use what you like, and it will still be a cupcake, but not the same as mine! ;-)

I don't pretend that this is healthy, and I'm sure arguments can be made about how God didn't intend for powdered sugar to exist in any form and how even unbleached all-purpose flour is a long way from whole-grain flour, but there ya go!

Now, here's the recipe as I made it:


Lemon Cupcakes with Raspberry Curd Filling and Lemon Buttercream Frosting
makes 24

Raspberry curd

  • 8 Tbs unsalted butter
  • 1 pint raspberries (2 of those small plastic clamshell boxes)
  • 5 large egg yolks, lightly beaten
  • 3/4 cup sugar
  • pinch of salt
  • 2-3 tsp. fresh lemon juice
Melt the butter in a large saucepan over medium heat.  Add the raspberries, sugar and salt, and stir until blended.  Temper the egg yolks by adding a little of the hot raspberry-sugar mixture into the egg yolks, then add all the yolks back into the raspberry-sugar mixture in the saucepan.  Stir frequently until the mixture boils, then constantly until thickened, about 10 minutes.  Set a sieve or coarse strainer over a bowl and pour the raspberry mixture into the sieve, then press down with the back of a spoon to force the curd into the bowl below, leaving behind the seeds. Stir in lemon juice to taste, cover, and put curd into the refrigerator to cool.  Can be made up to 3 days in advance.

Lemon Cupcakes


  • 3 cups all-purpose flour
  • 2 tsp. baking powder
  • 2 Tbs lemon zest
  • 1/2 tsp. coarse salt
  • 1 cup whole milk
  • 2 tsp. vanilla
  • 1 cup unsalted butter, room temperature
  • 1 3/4 cups sugar
  • 2 large eggs
  • 4 egg whites


Preheat oven to 350 degrees F.  Line cupcake tins with 24 cupcake liners.

Whisk together the flour, baking powder, salt and lemon zest in a medium bowl; set aside.

Add vanilla to milk; set aside.

In large mixing bowl, cream butter until light.  Add sugar, a little at a time until light and fluffy.  Add whole eggs and egg whites, blending until just mixed together.

Add about half the flour mixture and just blend, then add half the milk mixture.  Scrape down sides of bowl, then add the rest of the flour, and then the milk, scraping again as needed.

Divide batter among cupcake cups.  Bake for about 22-25 minutes, or until the tops of the cupcakes are just dry to the touch.  Transfer cupcakes from tins to a wire rack and let cool completely.


Lemon Buttercream Frosting

  • 2 cups unsalted butter
  • pinch of coarse salt
  • 7 cups of powdered sugar
  • 1 tsp. lemon juice, or more if needed to achieve correct consistency
  • 2 Tbs. lemon zest
Cream butter and salt until light and fluffy.  Add powdered sugar, one cup at a time, until all is blended, scraping down sides of bowl as needed.  Add lemon juice and zest, mixing completely.  Add more lemon juice (or milk if you don't have more juice) to achieve desired consistency for frosting.  You want it to be thick and dense, not too airy (which can happen if you over-mix it).

To finish cupcakes:

Cut a small hole in the tops of the cupcakes and spoon in the raspberry curd, then replace the tops of the cupcakes.  Frost and decorate as desired. Enjoy!


Vanessa